
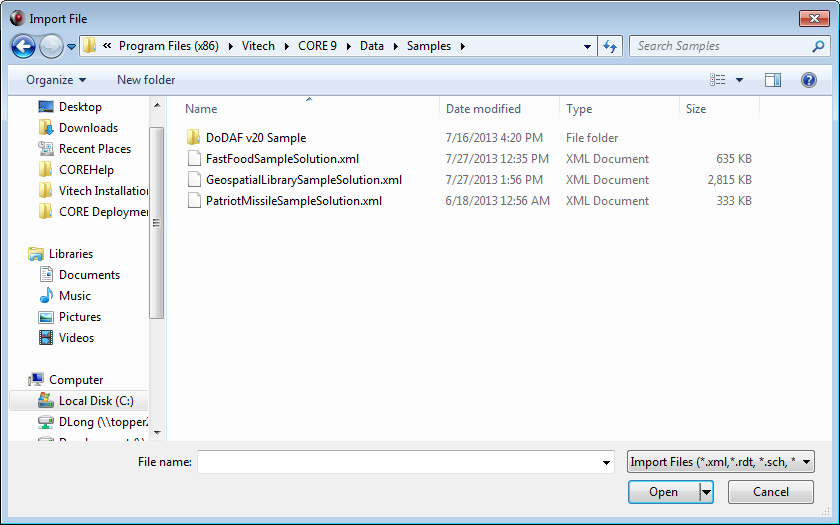
The Import CORE Data File command enables you to load a repository backup, a project, or a subset thereof from an interchange file on disk into the repository. When importing, you are first asked to select the desired file using the standard Windows file dialog. Supported file formats include CORE XML files (the current format) as well as RDT, SCH, STG, and CFT files (legacy formats). CORE processes the current and legacy formats differently.
Introduced in CORE 5.0, CORE's XML file format is the preferred format for exporting and importing CORE data. While legacy formats are still supported, the XML format contains the richest data representation and provides you the most control over export options and import behavior.
When importing data into the repository, the import wizard provides a number of options to control what data is imported and where it should be imported to. Within that framework, there are certain standards that CORE uses when dealing with data "collisions" merging information being imported and the information currently in the repository.
Unless otherwise specified, the information being imported will take precedence over the information already in the repository ('last one in wins'). This is true for specific attribute values, view descriptions, user properties, etc.
Relationship lists and element structures will merge.
When importing project backup, if the target project includes an element with the same name as an element being created, a conflict will be logged. CORE will proceed to import the new element's attributes on top of the existing element definition in CORE.
When importing project database changes, if the target project includes an element with the same name as an element being created, a conflict will be logged. CORE will automatically rename the element being created using a "_001" suffix. The existing element will not be overwritten. The assumption is that two users working offline may have independently used the same element name. Therefore, CORE preserves each user's contribution for the project administrator or merge manager to resolve.
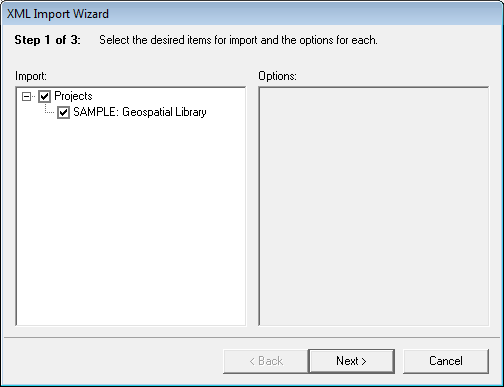
Step 1
When you select a CORE XML to import, you will begin an import wizard to guide you through the import steps. In Step 1, you are prompted with the manifest from the selected XML file. In this step, you can select the subset of data you wish to import from the XML file. If the XML file is a single project backup (the most common case), you will only see the single project in the optional data to import. If the XML file is a repository backup, you will have the option of selecting individual projects from the XML file as well as selecting the users and groups.
Step 2
If the file you selected includes project data, in the second step you will be prompted to specify the target projects to import the data into. This gives you great control over how to load the data. Most frequently, you will be importing a single project backup into a new project or importing a change set into an existing project. However, this step provides rich options to support a number of scenarios.
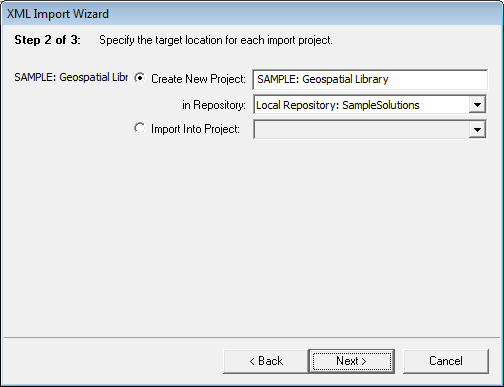
For each project selected from the import manifest, you have the ability to specify a target location for the project. If a project by the same name exists in the repository, the default selection is to import into the existing project. Otherwise, the default is to import into a new project of the same name. However, these are only defaults. In this step, you may:
Specify a different name for the project to be created.
Select a different repository in which to create the project. If you have logged into your local repository, your only option will be the local repository. If you logged into a remote CORE Server, the default is to create the project on the CORE Server, but you may change this to create the project in your local repository.
Select an existing project to import into. The project list will include all projects you have access to in the local repository and the remote repository (if you logged into a CORE Server).
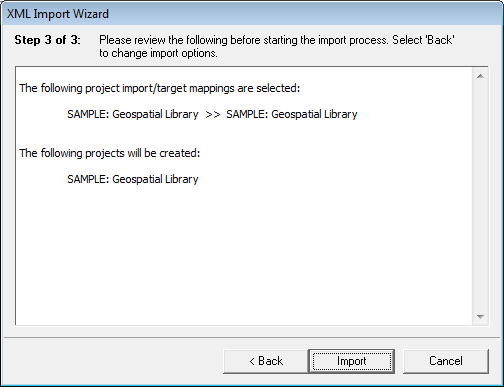
Step 3
In the third and final step, you have the opportunity to review the import actions before importing the file. Clicking Back will allow you to change the options. Clicking Import will proceed with the import. Clicking Cancel will abort the import.
If you proceed and if the data is being imported into a remote repository on a CORE Server, the file will be automatically uploaded to the server and the import performed remotely. Once the import completes, you will be notified.
 |
Critical Notes about the Import Process When importing a project backup or a repository backup into a new project or an existing project, the final step of the import process is to import the project-level access control information from the import file. In this scenario, the information from the import file replaces the existing project-level access control information, preserving the specification from the import file.
When importing a change file, CORE disregards the following project-level parameters: bitmapPath, creator, completenessCheckerName, consistencyCheckerPath, customCheckerPath, creationStamp, maintainMergeHistory, usesAuditLogs, usesVersioning, and accessControlList. This ensures that the configuration of the master project is preserved. |
For backward compatibility purposes, CORE can still import the legacy file formats used through CORE 4.0 and replaced by the XML interchange format beginning in CORE 5.0. The legacy file formats are:
RDT - an ASCII representation of a project's data. When an RDT data file is selected in the Windows file selection dialog, CORE will load the database contents into the open project (if no project is currently open, you will be prompted to open one). The data imported from the RDT file will be merged with any data currently in the project following the same rules used for the XML file format.
SCH - an ASCII representation of a project's schema. When a SCH schema file is selected, the schema changes from the file will be loaded into the current project (if no project is currently open, you will be prompted to open one). If the project is not currently in schema mode, the import process will prompt you before shifting modes. If you do not shift modes, the import will be aborted.
STG - an ASCII representation of user and group definitions. When a STG file is selected, the users and groups defined in the file will be loaded into the current repository. If any of the users or groups already exist, the settings from the STG file will overwrite the current user / group settings in the repository.
CFT - a conflict file, generated from the import of a RDT or SCH file. When the RDT or SCH import process encounters a conflict, CORE generates a human- and machine-readable file describing the nature of the conflicts and including the data that could not be loaded. Sometimes, those conflicts can be resolved and the CFT reimported to load the desired data.
| |
What permissions are required to import? To import, you must have administrator permission for the project. If you create a new project during the import process, you must have the create project privilege. |